|
STEP #1 Business Orders List
|
|
Step #1
- Create and remember a user name and password. Write in down and keep in safe place. Enter business name and location. If you want to keep address hidden click box: Hide my street address
Step #2
- Enter business information. If you want to keep your phone # private click box: Hide my Phone #
Step #3
- You can choose to create the order yourself or have SpeshNow assign the order to a Registered Designer/Rep or you can enter a Registered Designer/Rep # that you have chosen (You can contact a Designer/Rep before you begin and let them create the order for you)
Step #4
- Enter any keywords that pertain to your business. Any words that tell others what you sell or do.
Step #5
- Fill out the Referral form and pick one of the special options (Optional)
Step #6
- Click "Request Work Order"
|

Business Orders List
|
|
STEP: 2 Order form
|
|
|
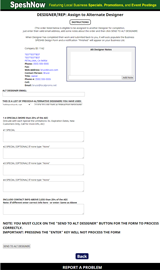
Assign Designer: is the Order Form and can be sent to an Alternative Designer
- Click on "Assign Designer". You will see a Alternate Designer Order Form where you can enter all the information from the business that you need to create the SPESH® Ad and/or Icon Image.
- You can use an Alternative Designer to design the SPESH® and/or Icon Image or you can design yourself. You must have an Alternate Designer lined up along with their email address. Be sure there are photos in the Photo Gallery so the designer has more options. You can resend if necessary.
Note: There are several companies out there that will create an Ad for you for as little as $5.00 like Fiverr.com
- If you are creating the images yourself, you could use the "Assign Designer" feature to enter the requested information from the business. Also to see what is sent to the Alternate Designer you can send to your own email first
- Be sure to see all the Sizes and Requirements first before you start. You do not want to go through all the process just for SpeshNow to reject the SPESH® Site order
|
Assign Designer Order Form
|
|
STEP: 3 Design SPESH® Ad and Icon Image
|
Now it is time to create the SPESH® Ad and/or Icon Image
|
|
There are a couple of ways to do this
Alternate Designer
- If you chose an Alternate Designer to create the images, they will receive an email with all the instructions
- It will show on the Business List "Sent to ALT"
- When they have created the images, they will upload through their email process which auto loads the Design Form with the images requested
- It will show on the Business List "Finished"
- It is your responsibility to pay for any services they charge you for
Create Yourself
- If you have the know how to create the images yourself then you can upload them right to the Design Form yourself
|

Icon Image
&
SPESH® Ad
|
|
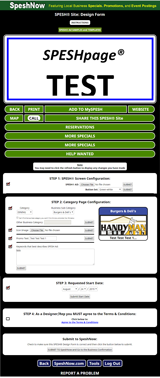
STEP: 4 Design Form - Creating the SPESH® Site
NEXT: Once you have created the SPESH® Ad and Icon Images, click on the Red
"Edit"under the "Ad Info" column on the "Business Orders List" it will take you to the Design Form
|
|
|
|
You are now ready to upload the images on the Design Form. There are a couple of ways to do this:
Alternate Designer
- Using an Alternate Designer and has completed the images, they will upload on their own emailed process which auto loads the Design Form with the images requested.
Upload Yourself
- After you have designed the SPESH® Ad and/or Icon Image yourself, you can go to the Design Form and upload the images right from your computer
- Once you are on the Design Form, fill out all necessary information
- Be sure to click on the "Instructions" button at the top of the screen for more information
|
Design Form
|
|
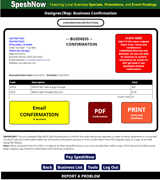
STEP: 5 Business Confirmation
NEXT: Once you click "Submit to SpeshNow" on the Design Form it will take you to the Business Confirmation Screen or you can click on the Red
"Confirm" under the "Confirm" column on the "Business Orders List" it will take you to the Business Confirmation screen
|
|
|
|
You MUST get the business to confirm the order. There are a couple of ways to do this:
Email Confirmation: This is the fastest and easiest way to get a Confirmation
- Click on Email Confirmation option.
- There will be an automatic email confirmation sent to the business. It will show a yellow notice on the Confirmation screen
- The business will need to click "Approve" or "Have Issues"
- You will get an email confirmation showing either option and the "Confirm" and the yellow notice will change to green when approved
NOTE: If the business cannot receive the email for some reason then you must use the other options
Electronic Signature
- You must have a program like "Sign n Send2" to use this option
- Click on the PDF option and bring up the Business Confirmation
- The Business Representative can sign the tablet
- Send the confirmation to yourself and their email address so both of you have a copy
- Have printed Terms and Conditions. Have them sign two copies so each of you have a copy
Paper Signature
- Click on the PDF option and print two copies of the Confirmation
- The Business Representative can sign the tablet
- Send the confirmation to yourself and their email address so both of you have a copy
- Click on the Terms and Conditions and print two copies. Have them sign two copies so each of you have a copy
- Be sure to click on the "Instructions" button at the top of the screen for more information
|
Business Confirmation
|
|
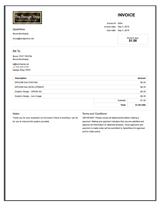
STEP: 6 Designer Rep INVOICE
STOP HERE >> NEXT: This is where you are on your own as an Independent Designer Rep.
You must give the Business your personal business Invoice
|
Once the SPESH® Site is created and confirmed by the Business, you are now ready bill your clients.
|
|
What should be included on the bill:
SpeshNow Fee
- You can do this two different ways: Invoice the business with all your expenses including the SpeshNow Fee or have them pay SpeshNow Separately
Your Charges
- For your services creating a SPESH® Site, which includes your time, other expenses like the Alternate Designer charges, photos taken by photographer, More Specials page, etc.
|
Designer Rep Invoice
|
|
STEP: 7 SpeshNow INVOICE
NEXT: Once the Design Form is submitted, you have the Business Confirmation,
there is a Balance Due on the SpeshNow Invoice, and you have been paid, the next
thing to do is pay SpeshNow
|
|
You can do this two different ways:
Pay it Yourself
- Once you invoice the business with all your expenses including the SpeshNow Fee and after you receive payment from the business, then pay SpeshNow yourself (if any payment is necessary) by clicking on the Pay Now button at the bottom of the screen
Pay SpeshNow Separately
- If payment is necessary, you can just have the business pay the SpeshNow fee directly by using the Paypal process with their information. Click on the Pay Now button at the bottom of the screen
- Note: Once SpeshNow Fee is paid the Business SPESH® Site will go active on the dates requested
|
SpeshNow Invoice
|
|
